Showing posts with label tile work. Show all posts

Monday, September 9, 2013

Summer Project, or What Was I Thinking?

I had a nightmare the last room to be remodeled was peeling toxic, lead paint! As much as I dreaded diving into another poisonous project, I do want the house to look somewhat nice when I sell it. This room, the pantry, is the only one left with old "granny green" on the walls.


I left it for last because if I want to change the color, I'll also need to replace the old tiles on the counter. Although I've cleaned them thoroughly, the grout is stained and some of the backsplash tiles are loose.


No, I don't want to strip old paint, scrape and sand, chisel tiles, add new tiles with glues and grout, prime the walls with stinky primer, and paint with high VOC paint. This tiny room has eight shelving layers, six drawers, two cupboards, a counter and a window. It totally rivals all other rooms in the house. LOTS OF WORK. I'm so tired of all these toxic projects, but I don't want a prospective buyer to take one look at that room and think LEAD PAINT: DANGER! and walk away from the sale thinking the whole house is poisonous. This is the LAST room in the house to be done!

Lead paint. Oh, great. If it's lead paint, how am I going to sand and scrape off the old paint? I started researching safe methods. I kept thinking it would be so much easier if it wasn't lead, but the house was built in 1922 and this paint is old. It has to be lead.

I found a store that sold lead tests. I made a decision if it was lead, I'd leave it alone and not worry about it. (That nightmare prompted me to remove everything out of the pantry!) If by slim chance it wasn't lead paint, I'd re-do the whole room.

It was NOT lead! I tried the test several times, on different surfaces, even testing the paint underneath the green layer. NO LEAD! Even with this good news I keep thinking, maybe the paint is lead and the test is faulty! There was a tester in the packet to check to see if it was working correctly, but one can never be too trusting. Others reassuring told me if lead paint was really that toxic, many generations of professional painters would be dying from it. Supposedly it only makes children brain dead, not adults. I don't know if that's true, but it gave me courage.

I threw all caution to the wind, as I tend to do, and jumped right in. I used plastic to cover the floors and seal off the entrance. With gloves, goggles, mask and apron, I started by cleaning everything, then removing the tiles. Not fun. I can't imagine people who do this professionally every day.


It involves using a sharp tool and pounding it with the hammer until the tiles pry loose. Dust, bits of wood, cement and old grout flying in my face. I did a little each day. This wasn't as bad as re-roofing my garage, but close in terms of physical labor. I can't imagine removing a whole floor or wall of tiles!


I filled in holes where the backsplash tiles were with wood filler and smoothed the surface. Unfortunately, the backsplash was right under the window ledge so getting it smooth was a challenge.
 
The first photo above makes the room look like it's in fairly good shape, but
you really need to look closely. Evidence of years of wear. There are
even markers on the archway left by former tenants where they measured
the height of their little boys every few years!
 
Then I stripped, sanded and scraped the old paint off the removable pieces until the surfaces were paintable. I did this in the garage. For the permanent shelving and places difficult to reach, I used a deglosser as a liquid sander. That stuff is nasty toxic!

Then I primed everything.

 
I used the very toxic Zinsser Primer because it's the best. It covers and seals any surface and is much stronger than other brands. Unfortunately, even with a mask on it had a strong ammonia smell and in that tiny room I was quite worried about adequate ventilation especially while I was working up by the ceiling. The fan was running constantly pointing out the window. Again, I did just a little each day so as not to over expose myself.


Besides air quality issues, priming such a small space and a ceiling is really difficult as there is no place to stand so you aren't directly under the dripping paint. The bright light at the ceiling made it difficult to see as well. I constantly asked myself, What were you thinking? and promised, yet again, to never do another one of these poisonous projects.
 
I've never tiled in my life, but did that scare me? Well, yeah! I was terrified. It took me weeks of planning, preparing, ordering supplies before I was brave enough to venture forth. I survived. I've written a separate post on tile work for those of you who want detailed instructions.
 
Painting! Oh, I couldn't wait to get to this part! I wanted a cheerful color to match the blue kitchen. For the last eight years I've had a Claude Monet poster from Giverny, France hanging in the pantry to cover up the scrapes and gouges in the wall. I decided to use that color scheme as my source.
 
 
Love the colors!
 
The blue matches the kitchen so I went with a same blue, turquoise, and white trim.  I really, really wanted turquoise on my walls!


I got some free sample paints from the local hardware store. Unfortunately, they don't give out free low VOC paints so they are incredibly toxic. Still, I needed the heavy-duty chemical paints for the shelves so the surface would be rock hard and durable. Low VOC paint is NOT recommended on horizontal surfaces as anything you place on top of it will stick and pull away the paint. I learned this the hard way. The samples were for a flat finish which I find difficult to clean so I got a darker turquoise and mixed it with white glossy paint. It's more of an aqua color with the white added which is closer to the poster's color.
 
The toxic paint was awesome. It went on so smoothly and only required one coat, unlike low VOC which can require multiple coats just to cover the surface adequately. But SMELLY!  Eeewww! I used an air purifier working full time and a fan pointed out the open window. 
 
Voila!


I got a little crazy with the ceiling. I think Monet would have liked sunflowers:


The sunflowers are in bloom so I couldn't help myself, however, I did the ceiling first because I didn't want paint dripping down on the new countertop. If I would have saved it for last after I painted the walls I might have painted bright, tropical fish instead. The colors feel very aquatic.
 
For such a tiny room, it was hell. A quarter of the size of any other room in my house and it took four times the effort. Many times I considered hiring someone to finish it for me, but Yatna, my menopausal alter ego, would scream, "OH, NO YOU DON'T! NO BAD MEN ALLOWED IN THE HOUSE! WE CAN DO THIS ALL BY OURSELVES."
 
Even with all the protective gear I wore, I have only so much time before the chemical exposures start affecting me. First sign it's getting to be too much are the weird dreams, then inability to sleep, and pain in neck and joints followed by sinus congestion, headaches, sore throat, and lung pain. I know it's time to stop.
 
With all that toxic high VOC paint, it may take months to offgas. It took nine months for my upstairs floors to offgas fresh paint and during that time I lived in the downstairs rooms. That's OK. I'm so enjoying the new colors I think I'd rather use it as some kind of shrine. Maybe I'll put some religious paraphernalia in there and use it only for display. For now the fan is running constantly and I still have it sealed off. I'm considering covering everything with an acrylic coat to protect the paint from scratches, but that will have to wait.
 
I'm so glad it's finished. It's the satisfaction of completion and gazing upon those lovely colors that makes it all worthwhile.


Saturday, September 7, 2013

How to Tile a Countertop

I'm writing this post for instructions on how to tile a countertop because I couldn't find much online with basic instructions. I am courageously remodeling the pantry and wanted to do something simple and less expensive for the small countertop. As you read this you'll probably thing she doesn't know what she's doing and you would be right!


Supplies:

Goggles, gloves, apron
Plastic to cover and protect area
Hammer
Screwdriver or paint scrapper
Wood piece for under front edge (optional)
Tape
Vacuum

Tiles
Ceramic Tile Acrylic Adhesive
Notched Spreader
Rags for clean up
Sponge or damp rag for adhesive clean up

Grout
Spatula
Grout Floater
Sponge
Buckets of Water
Dry Rag

Grout Sealer
Dry Rag


Step one: Figure out the plan.

In my kitchen pantry I have a small counter just under 10 square feet in size (5 feet x 1 1/2 feet with some edging). The original tiles were one inch square covering the total surface and facing edge in multiple colors of green with old, discolored grout. Who ever set those must have had a whole lot of patience!


Most stores had only the glossy white tiles available and sold per tile or per case. This would have saved me money, but then someone told me glossy scratches easy and with all the abuse a counter would get moving boxes across it or banging jars on it, matte would be more durable. I did want them to match the floor which is a matte white. My floor tiles are 12 x 12, but that size is too big for this little counter.


I didn't want to rent a tile cutter which was quite big, heavy and expensive, so I opted for 4 x 4 tiles. I ordered the minimum which was a case for $24.50. Initially the sales woman told me after doing the math there were 50 in a case. When the case arrived I realized there were 100 in a case.

I measured the space and realized unless I had very wide grout lines, I would need a smaller size tile somewhere in the design. I also tried to find small trim for the edge, but what was available was too wide. I considered letting the trim pieces overlap but with cupboards and drawers under this counter, I was afraid of snagging the edge and ripping off the tiles. I could have ordered a case of small size tiles or edging, but minimum case orders are costly when I only needed a small amount. I bought sheets of hexagon designs with little one inch squares so I could use the one inch squares.


The individual pieces come apart.
 
 
Using one inch squares is a little weird I know, but I figured if the old design can use them, why not? I was trying to keep the project simple, easy, and cheap.
 
Once I figured out the most efficient option and gathered the supplies, I was ready to dive in!
 

Step Two: Remove the old tiles.
 
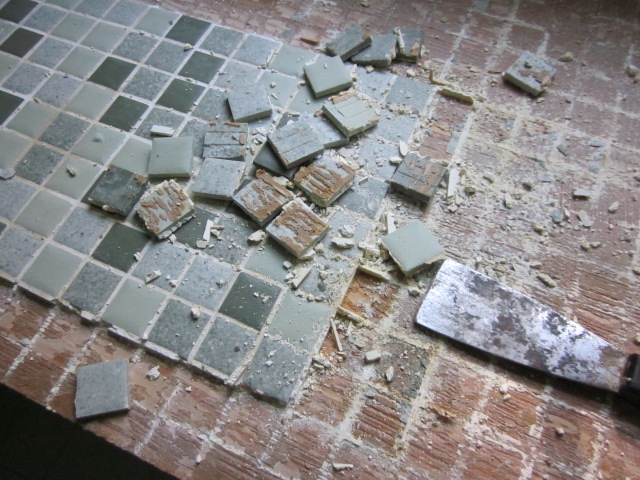
First, cover all other surfaces and floors and wear gloves and goggles. I used a hammer and a metal paint scraper. I started with a screwdriver but the scraper was wider and remove more faster. This is messy work with glass-like chips, wood splinters, dust and dirt flying everywhere.


It's important to get as much grout, tile and glue off so the surface is smooth, clean and level.
 
 
After scraping, I used a electric sander but it didn't make much difference. I was told adhesive for tiles is like cement. Sanding doesn't affect it. I used a paint scraper to make it as smooth as possible.
 
I attached a piece of wood under the counter in the front to hold up those edge tiles.


I saw this on an online video, but I think this is only necessary for larger, heavier tiles. I added a piece of paint tape because I kept thinking if the adhesive sticks to the wood piece, when I remove this wood, half the tiles will be yanked off. I think the wood piece was more hassle than necessary. If you have big facing tiles you'd need it.
 

Step Three: Lay out the tiles and figure out the design.
 
I did this about five times! Trying to figure out how to space them seems like it would be easy, but I was worried about the adhesive. It is highly suggested to use spacers in between the tiles and you can buy a whole bag of 500. I didn't want this extra expense and with such a small, strangely shaped space, I didn't think they'd help. You can't be wasting time trying to figure out spacing and getting all the lines straight and the spacers inserted when the adhesive is drying. I think if I were to do a large space like a floor and in sections, using spacers would be an advantage. I decided to just eye it.
 
 
As you can see the counter is mostly 4 x 4 tiles with the little 1 x 1 tiles at the back to take up room and at the front for the edge. There are some 1 x 1 tiles at the side where the counter fits around some architecture. Not a great design, but it works. I was going to have to eye it so I practiced laying them out. Five times. I wanted to make sure before doing anything permanent with glue or grout.


Step Four: Stick 'em on.
 
I used a small container of Ceramic Tile Adhesive. The instructions say it will cover ten to fifteen square feet and since I had a little less than 10 square feet I hoped this would work. Directions say to spread it thin, but not too thin, then "score" it with a notched spreader or trowel.
 
 
I bought one of the smaller sized notched spreader tools for only 79 cents instead of a trowel since I was doing a small space. I used the flat edge to spread the adhesive on the surface. I was told to use the large jagged teeth, but I think it depends on the thickness of the adhesive and the size of the tiles. In hindsight I should have used the medium teeth for the four inch tiles and the small teeth for the one inch tiles.
 
It was difficult trying to figure out how thick to lay the adhesive. I knew I needed to use the whole container, so I used that as a guide, but it seemed too thin to me. I'm not sure how that container would have covered "up to 15 square feet". It barely covered less than 10.
 
Laying out the tiles was scary. You have to work fast, but still get them straight and spaced evenly. The 1 x 1 inch tiles were difficult to handle because the adhesive was sticky and slippery especially wearing plastic gloves. I worked up one side at the left then across the front so I could judge the 90 degree angles. I'm sure there are more professional ways to do this line laying plumb lines, but this was a small space so I figured I could eye it. Again, the 1 x 1 tiles were the problem. I set them out too far apart and ended up with left over tiles! So I adjusted some which hopefully isn't a huge faux pas in technique. More difficult to judge than I anticipated especially when one is nervous. The edge tiles didn't want to stick so much and they kept wanting to slide down slightly so in a way I was glad I had the wood piece attachment to support their positions until I could shove them securely into the adhesive. Once I got them all in place I twisted them into the adhesive tightly. I still don't think for smaller tiles one needs the wood piece.
 
Then I took a large piece of 2 x 4 board, set it on top of the tiles to make sure they were level with one another. Tapped lightly with a hammer. You are also supposed to use a level to make sure the whole surface is level. I wasn't going to buy a fancy level and if it showed that the surface was not level, what was I supposed to do? It didn't make sense for such a small surface.


Step Five: Clean up and finish.
 
With a damp cloth (or sponge), carefully clean off as much adhesive as possible before it dries on the tiles. If you don't get it all, don't worry. The great thing about ceramic is it's like glass. Any adhesive residue comes off easy with a flat edge exacto knife blade.
 
After an hour of letting it all sit I removed the wood piece. The edge tiles didn't slip off and were stuck securely.
 
Directions on the container say to wait 48 to 72 hours for drying time before adding grout. Don't mess with them until then.
 
Oddly enough, it doesn't smell. You would think adhesive would be deadly, but even when I had professional flooring people do my kitchen floors they didn't stink. I love ceramic tile!
 
THREE DAYS LATER...
 
I crossed my fingers and lightly touched the corners of the tiles to see if they were secure. They were! Even the little tiles on the facing edge. You can't imagine how relieved I was!!!
 
Step Six: Grout
 
I bought a small container of Pre-Mixed Grout which comes white only. If you need colored grout you'd need to mix it yourself. So glad I needed white! I like an easy project.
 
Wear a mask, gloves and apron. This step is messy!
 
I scooped it using a plastic paint scraper so I could use the sharp edge to get it into the corners. Then I spread it into the lines using a rubber Grout Floater tool. I was told the rubber ones are better than the latex. All the instructions I read said to spread it at a 90 degree angle...I wasn't quite sure what that meant. I figured that out while doing the actual spreading and trying to fill all the little lines completely - run the spreader against the lines not along the lines, so if the lines are vertical, spread horizontal across them that way the grout scrapes off the edge of the tool and compacts into the hole. That probably isn't any clearer! Well, do whatever you can to make sure the grout is packed into the lines and no air bubbles are left. Using the floater, remove as much excess grout off the tile tops as possible.
 
Because I opted not to use fancy edging, I needed to put grout between the two rows of tiles at the front edge and try to make it look as pretty as possible. I used my fingers and packed the grout in. This was SO MESSY with sandy-textured white mud dripping on the floor and down the plastic-covered walls. Once I got the grout packed in these small spaces, I carefully used the float to smooth it out and make it even praying those little tiles wouldn't pop off. I was told to make this edge diagonal rather than a sharp corner so it wouldn't chip off easily. I'm surprised it worked so well. I was worried about how the edge would end up looking since it's not a professionally-bought option. Not bad!
 
Close up of edge and one inch square facing tiles.
 
 
With a damp sponge and a bucket of water, I cleaned the excess grout off the tiles using diagonal wipes, rinsing the sponge often. This was really messy. I tried getting the extra grout off the walls and all I could do was smear it all over. I kept rinsing the sponge and wiping it off repeatedly! Eventually it looked even and clean.
 
Grout smells a little like paint, not as strong, but a distinct chemical smell.
 
Dump the bucket of grouty water somewhere outside far enough away from curious bunnies.
 
If a filmy haze is left, they say don't worry about it. According to the grout container instructions, it should be dry in about four hours. At that time use a dry, soft, cloth to remove the haze by "polishing" the tiles. If the haze still exists after 24 hours, it can be removed with Grout and Tile Cleaner. I didn't want to buy another toxic product so I used an exacto knife blade and scraped off any excess residue.
 
TWO DAYS LATER...
 
Step Seven: Sealer
 
This will seal the grout so it's stain-proof. Sealer can be bought in a plain bottle, squeeze bottle, or spray bottle. I got the squeeze bottle with the brush on the end. Apply it to the grout, wait 10 - 15 minutes, and wipe the excess off the tiles. I did this for my floors so I can confidently say I am experienced at the sealing step!


Done! Hooray!


When the whole pantry is finished, I'll post the process with more photos.