I have a list of projects I want to do this year: new heating, removing old heating, re-roof my garden shed, build a cement step, and line my closets. These are the extracurricular activities that keep me sane while living isolated in the middle of no where. My plans began weeks ago. Unfortunately it was in the middle of unloading supplies when I stopped to swing at bees and slammed my foot into the cement. Projects were delayed while the foot healed. I'm now ready to go!
This year the theme of my summer construction is: "Practice for a Tiny House." I figured since I'm not quite ready to start building a tiny house as I have no land to put it on, I'd learn some of the skills I'll need to know on my current house. I've often said this is my "practice house" and I've done some major screw-ups all in the name of learning.
I have two unlined hall closets at the stair landing on the upstairs level outside the bedrooms.
.JPG) |
| Right side. |
.JPG) |
| Left side. |
 |
| "Cantaloupe" (right side) |
 |
| "Mango" (left side) |
Yes, that slanted ceiling is the roof line and each closet has one side that is an exterior house side. Someone told me these closets were probably used for cold storage in the old days. I believe that. In the winter they are damn cold! I've never used them for anything so it would be nice to make them usable. And pretty.
When I first moved here both were lined with raw, formaldehyde-soaked, toxic fiberglass insulation although someone forgot to enclose it all with walls. I couldn't stand the thought of something so toxic so close to my sleeping area so I ripped it all out. I'm pretty sure throughout the years much of my winter heat has escaped through these closets. The floor insulation is still showing and anytime I go into the space my lungs and sinuses start hurting.

The second step was to use caulking and plug up the holes in the wood. Yep, you could see outside through the holes! They weren't big, but big enough for a bee, hornet, or spider to get through. (I can't even imagine what the rest of the house looks like!) The great thing about these old houses is they are built with good, solid, beautiful, un-treated wood. Another awesome thing about old houses is they breathe. They breathe because they aren't sealed up tight like new construction and that also makes the indoor air quality less toxic. Unfortunately, the breathability also means they lose heat and allow in all kinds of critters not to mention rain and weather. (Untreated wood means they are susceptible to house-eating bug infestations, but let's not talk about that and I'll continue to keep an eye on everything!)
My plan is to line the walls with insulation and cover it with paneling so there are real walls. Constructing walls is something I'll need to do with a tiny house so this will be good practice. I also plan to add lights to these closets. Learning electricity will be a huge challenge, but filled with enormous benefit. If I get electrically comfortable, I'll replace my own heating and not have to rely on electricians and heating guys who just don't bother showing up! I'm ready to do this! I am BRAVE!
So let's get started...
Someone on Freecycle gave me a half roll of free roofing felt/tar paper to line the walls (and to use on the garden shed roof). The cavities are all unevenly measured, something you might not find in a newly constructed house. Most houses these days are 16 on center so the 2 x 4 studs are spaced 16 inches a part. Tiny houses use 24 on center to reduce the weight of too much wood. The wall cavities in my closets are 12 inches, 14 inches, 14 1/2 inches, 15 inches, 22 inches, etc. Weirdness. Makes it really difficult to measure as there is no consistency.
Next step, add insulation. I've been reading a lot on different types of insulation. There are concerns when packing walls, floors and ceilings with filler: fire, mold, bugs, and chemical toxicity. Here are the types of insulation I've found so far and some of their properties:
Fiberglass with Formaldehyde This stuff is as toxic as it comes, even cancer causing, but really cheap which is why it's so popular. It's also easy to install and has a ready-made plastic vapor barrier. I hate plastic. I will avoid this type of insulation.
Fiberglass without Formaldehyde This stuff is half as toxic, but I still don't want to breathe fiberglass particles. I had enough problems with my fiberglass-constructed heating system.
Cellulose Blow-in Cellulose is made from recycled newspaper, cardboard, cotton, straw, sawdust or hemp. Yes, it's a natural product which makes it a huge fire hazard so to compensate it is treated with toxic ammonium sulfate. It also will slump in a wall cavity and mold, but I've heard it's good for flooring insulation, aside from the toxicity. It's normally blown-in so you have to own or rent a blower.
Denim This isn't recycled blue jeans that have been worn for years by people; it's denim remnants, or left over pieces of fabric from clothing manufacturers then treated with borates for fire and pest protection. I was really excited about this when I first heard. Who doesn't want to recycle? Unfortunately, I couldn't find a store that has it in stock as it must be specially ordered. What a pain. I got online and ordered a free sample swatch from a company. Then I was reading the blog of a chemically-sensitive tiny house builder who said after using this insulation she became sensitive to cotton. I've known people to be allergic to cotton, but everytime I hear of someone who says they've "become sensitive", it's usually because the cotton has been treated with chemicals rather than the cotton itself. Like my "organic" sheets. "Blue" jean material is dyed with some really nasty chemicals and then saturated, like most new clothing, with formaldehyde and other mildew resistant chemicals. This jean material wasn't well-worn and washed multiple times allowing lots of time for offgasing. It's brand new. Who knows what else they are doing to it once it's mushed up into insulation. Hmmm...I wondered about this. The sample arrived a month later. It has a nice feel and I stuck my nose into it. No strong smell, but it did give me a "ugh" feel. I also read denim insulation slumps and can have mold/mildew issues due to its weight. Tiny houses due to their small interior spaces can have condensation issues which can result in mildew/mold. It's also only 2 inches thick and most cavities are 3 - 4 inches so it doesn't seem very effective. It also comes in strange widths and some have complained trying to cut it and install it is a nightmare.
Wool Wool is fire resistant, bug resistant, and mold/water resistant, but unfortunately it's really expensive. As high as ten times more than anything else. One company sells it for $35 - $59 (depending on the thickness) for one batt (about 12" x 22"). I think wool would be great if you had access to sheep and could get it free. I don't know if wool slumps nor if it's as effective as other types of insulation. Cob house people love using wool and it's natural.
Stone Wool As I'm shopping the hardware stores, I came across Roxul Insulation. It's stone wool, or spun rock (?) with added recycled material although the type of recycled material is not listed. It's fire resistant, bug resistant, water repellent, and "planet-friendly" with certification for indoor air quality. They advertise its use for hospitals and baby rooms for noise resistance and low toxicity which caught my eye as well as having a fairly high insulating efficiency. The salesperson told me it was brand new in the store which accounts for why I've never seen it. It's also three inches thick. Great marketing campaign. Look at that sweet baby! Someone knows how to sell! So I get online to research what they might not want me to know. They use formaldehyde in the adhesives, but only 5-6% and the company claims it's is offgassed in the heating process. Right away I'm leery, but this product seems to be the most hopeful and I feel adventurous. It's about the same price as the pain-in-the-ass denim, but it's right in front of me so I don't have to special order it and of course, it's the same price as the wool insulation only I get 11 more batts! I come to the conclusion there is no perfect insulation and I'm working on these closets as an experiment so why not be brave and make some discoveries? If it all goes wrong I could rip it out and give it to someone else. I buy one bundle which is twelve 47" x 15" batts. I'm told by the salesperson to cut it with a bread knife as using an exacto knife would mangle it. Hmmm...OK. Weird, but in a cool way. I wore a mask and gloves because it still has an itchy, creepy feel. Cuts like butter, easy to install, and no smell at all! In fact, prior to its installation, being in the closet with the floor insulation made my lungs hurt, but once I got this stone wool insulation up, I didn't seem to have as much of a problem, but it still bothers me. We'll see once I get the walls up if it affects the air quality.
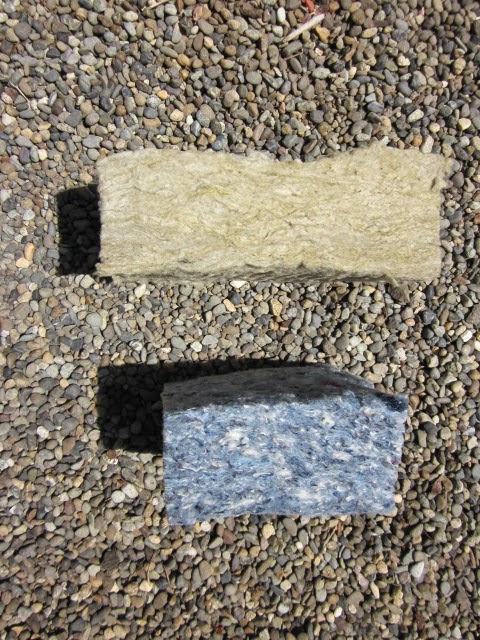
I pretty much gave up on getting a denim insulation sample so I bought the Roxul before it came. Here are the stone wool and denim side by side for comparison:
The denim is so much softer than the stone wool, not as scratchy and oily feeling, but it doesn't feel as strong or rigid. It's like cotton balls. Hmmm...I like it, but would it really work inside a wall? It seems to have sagging potential which I wouldn't like. The smell isn't strong, but this is a fairly small piece.
It looks like they are the same thickness, but the stone wool on is more compressed. It tends to expand more once out of the package. The denim is light and airy...like a big cotton ball. I wouldn't think it would be as efficient as the stone wool. I do like the idea it's recycled material, though.
Here is the stone wool insulation cut to perfect size and fitting snuggly. It even stands in place by itself and that makes it easier to install. I think the denim would be sagging all over making it harder to install. I think the stone wool was a good choice.
Then I had to consider what kind of wood for the lining. I didn't want anything that was treated or smelled. Everyone suggested cedar because it smells good and because of this popular for closets. Cedar is also fairly bug resistant, but I don't want smelly stuff. Cedar is also more expensive. Not only that I want to paint these closets to match the rest of the house which would negate the cedar-y smell. For a tiny house, I'd probably use knotty pine, but since these are closets I got the knotty pine panels which are a little thinner, but still wood. They are untreated and smell good to me, like wood.
.JPG) |
| Pine is so pretty! And this is without paint. |
Thinner panels are cheaper, too, and cheaper means less quality, but I'm experimenting. For the second closet, I might be getting old tongue and groove oak flooring from a remodel job which I'm really excited about. I'll have to sand it down, but it's free so I'm not complaining. Of course, oak is awesome quality so I can't decide if I should use it for the second closet or save if for my tiny house. I'm interested in learning how to create a wall using tongue and groove wood, how it works, the best way to attach it, and problems I'll encounter.
 |
| See studs at sides? They don't go all the way up. |
I'm already freaking out about how to attach the wood. Do I do the ceiling first or the walls? Screws or nails? The studs up the walls are not flush with the center stud in the ceiling so how do I line up the ceiling panels? What is the best way to measure a wall that is the shape of a triangle? How do I get everything to line up so it doesn't look like crap. How do I get around the electrical wires that weren't embedded into the studs? Should I wire for lights first or do it after I install the walls? Jeez. Never fear. I am getting loads of information off the internet and I have a construction friend who is giving me advice.
 |
Electrical wire and box wraps around the stud instead of through it.
I was told to leave a hole for access. Darn ugly, if you ask me. |
Now to work out the logistics...To be continued...

.JPG)
.JPG)
.JPG)


.JPG)


.JPG)


.JPG)


.JPG)